Record Script Dialog
Used to set the file format and record the active script.

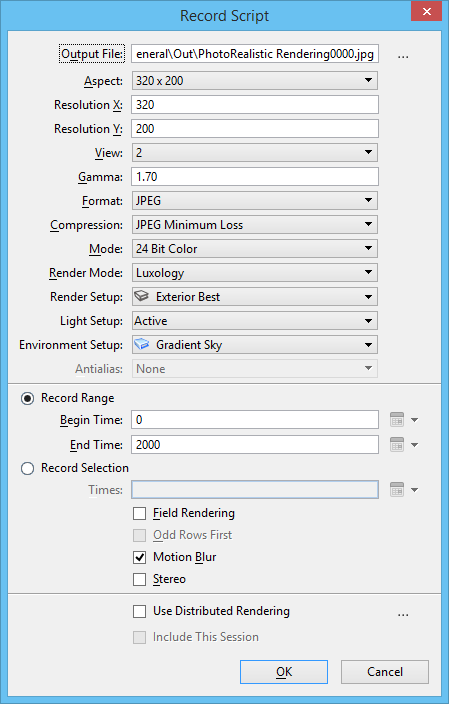
| Setting | Description |
|---|---|
| Output File | Displays the name of the output file(s). A default
file name is displayed, which takes the form
<DGNfilename><digits>.<format suffix>. For example, if you
are creating a 75 frame sequence of TIF files for DGN file Stadium.dgn, then
the default file name would be Stadium00.tif. If the sequence was 1000 frames,
then the name would be Stadium0000.tif.
Some formats
such as Targa or TIFF create separate images for each frame. When you select
these formats, a separate file is created automatically for each frame in the
sequence. You must insert a number at the end of the filename, and this number
is incremented for each frame saved. For example, naming the file that contains
the first frame of a Targa-format sequence
"orbit01.tga" causes the subsequent frame files
to be named orbit02.tga, orbit03.tga, orbit04.tga, and so on. In the event of
an interruption to the process, you can return later and pick up from the next
frame number in the sequence.
If you require single file movie formats, such as FLI or FLC, you can convert the sequence to the required format via the Movie Player. |
| Record Image File Icon | Opens a dialog that lets you choose a different name, path, and/or file format for the animation sequence. |
| Aspect | Lets you select from a variety of commonly used screen resolutions, including NTSC and PAL television formats, as well as Custom, if you require something different. |
| Resolution X, Y | Sets the animated sequence's horizontal (X) and vertical (Y) resolution in pixels. If the lock control is closed, the ratio between the Resolution X and Resolution Y values are constrained to match the aspect ratio of the source view. |
| View | Sets the view for the recorded script. If the viewing parameters are controlled by scripting cameras or saved views, they are inherited from the view. |
| Gamma | Sets the brightness of the images in the output file(s). The default value is 1.0; the valid range is 0.1–3.0. Increasing the Gamma Correction lightens the images; decreasing it darkens the images. |
| Format | Sets the output format for the animation files. |
| Delete Frames Icon | (Format set to Windows AVI or Windows Media WMV only) If on, deletes the source images after the movie is created. |
| Codec | (Format set to Windows AVI or Windows Media WMV only) Allows you to select the codec needed to read the file format selected in the Format drop-down menu. |
| Codec Settings Icon | (DV Video Encoder, Cinepak Codec, DivX 6.9.2 Codec, TechSmith Screen Capture Codec and Windows Media Video 1, V7, V8 and 9 codecs only) Opens a property dialog, which displays the properties of the selected codec. |
| Compression | Sets the degree of compression for an image file format. For example, compression options for a JPEG format image file are from Minimum Loss to High Loss. Greater compression is achieved as image quality is sacrificed: Minimum Loss yields the highest image quality and least compression; High Loss yields the lowest image quality and the greatest compression. |
| Mode | Sets the number of colors in the output file. |
| Render Mode | Sets the rendering method — From View, Wireframe, Hidden Line, Filled Hidden Line, Smooth, or Luxology. |
| Render Setup | Lets you select a defined render setup. |
| Light Setup | Option menu lets you select a previously configured lighting setup. |
| Environment Setup | Lets you select an environment setup that is in the DGN file, or Untitled for the current settings. |
| Antialias | (Render Mode not set to Luxology) Sets the quality of antialiasing for the animation — None, Very Low, Low, Medium, High, Very High. |
| Record Range | If on, lets you input set beginning and end frames/times for the sequence. |
| Begin Time | (Record Range selected only) Sets the animated sequence's beginning time, or first frame. |
| End Time | (Record Range selected only) Sets the animated sequence's finishing time, or last frame. |
| Set Start Date/Time icon | (Time display set to a date or time format only) Opens a date and time dialog that lets you set the start date/time. |
| Set End Date/Time icon | (Time display set to a date or time format only) Opens a date and time dialog that lets you set the end date/time. |
| Record Selection | If on, lets you define a range of frames/times to record. |
| Times | (Record Selection selected only) Lets you input a
range of frames/times to record. Frames can be specified in a continuous range,
as individual frames, or a combination of both.
For example, entering: |
| Field Rendering | If on, creates sequences that are suitable for recording/playback on video systems, in which each frame consists of two fields. When Field Rendering is enabled, each frame is rendered in two passes, with the second pass half a frame ahead of the first. These are then interlaced, such that the resulting frame matches the field refresh rate of the display system. This technique effectively doubles the apparent refresh rate of the recorded sequence from 30 to 60 fields for NTSC and from 25 to 50 fields for PAL. |
| Odd Rows First | (Field Rendering enabled only) Determines whether the odd rows are taken from the first or second rendering pass. (This is sometimes referred to as "2:1" or "1:2" interlacing.) Most video recording equipment expects the even row first, so Odd Rows First is turned off by default. |
| Motion Blur | If on, motion blur is applied to the script. Motion blur is the effect of "blurring" objects as they move on the screen, giving them a smooth and more realistic appearance of motion. The quality of the motion blur is affected by the Antialias setting. For example, setting the antialiasing quality to a higher value improves the effect of motion blur at the expense of render time. |
| Stereo | If on, creates a 3D animation with a stereo effect that is visible when viewed with 3D (Red/Blue) glasses. |
| Use Distributed Rendering | If on, enables distributed rendering for saving the animation frames to disk. |
| Include This Session | If on, the current session of OpenBuildings Station Designer will do work in contributing to the rendering. Check this box to improve rendering times but leave it unchecked when you wish to use the current OpenBuildings Station Designer session for other work. |
| Distributed Processing Settings icon | Opens the
Distributed
Processing Settings
dialog.
|

